PROCEDURE valid for all ROVER models with single color TFT DISPLAY
For example: ATOM LIGHT Series, ATOM POWER, DIGICUBE, TOUCHMETER, HD LIGHT, HD COMPACT Series,
EASY METER Series by PRIME DIGITAL, HD TAB 4 Series, TAB 5 series,
HD TAB 7 Series, HD TAB 700 Series, HD PRO, HD TAB 9 Series, HD TAB 900 Plus and HD PROTAB Series.
Using the instrument keyboard it is possible to create, directly in the instrument, of the MANUAL MEMORY PLANS, for example MANU 2, MANU 3 etc., containing satellite transponders of your interest.
IMPORTANT: Find updated lists of all satellite transponders directly on the “www.lyngsat.com“ website to create your own manual memory plans (see example figure 1).
PREREQUISITES: To create a manual memory, it is necessary to know all the data of the satellite transponder to be memorized (DVB-S or DVBS-2): Frequency, Polarity (V=vertical or H=horizontal), Band (L=low or H=high) and Symbol Rate value. Make sure that the diameter of the satellite dish used is compatible with the satellite you need to receive. In the figure below, we report an example of data for a satellite transponder (Frequency, Polarity and Symbol Rate) reported on the site “www.lyngsat.com“
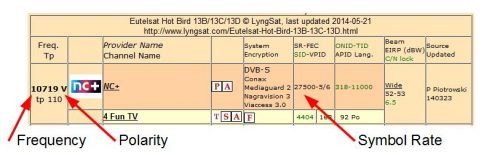
Figure 1: Data of a satellite transponder site “www.lyngsat.com“ example
NOTES for EUROPE (for USA & ASIA select the relevant data):
– Lowband and Highband: The transponders with frequencies from 10.700 to 11.700 MHz are transponders in the low band (Low=L), the transponders with frequency from 11.700 to 12.750 MHz are in the high band (High=H).
– Local Oscillator Frequency (OL): The frequency of the local oscillator to be set in the instrument (referred to a Universal LNB) is 9.750 MHz for the low band (L) and 10.600 MHz transponders for the high band (H) transponders.
PROCEDURE:
1. Turn on the instrument,
2. Make sure you have selected your language,
3. Press the “SAT” button,
4. Press the “PLAN” button,
5. Rotate the encoder and select the word “SATELLITE” (Figure 2),
6. Press the encoder to confirm,
7. Rotate the encoder and select, for example, the satellite “HBIR13” (Figure 2),
8. Press the encoder to confirm,
9. Rotate the encoder and select the “MEMORY” icon (Figure 2),
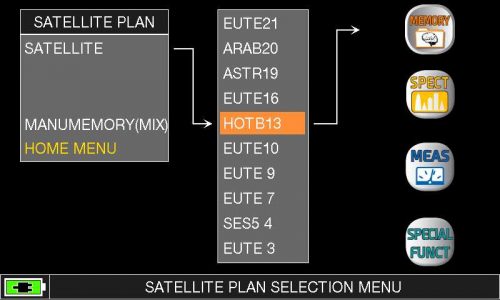
Figure 2: “SATELLITE”, “HBIR13” and “MEMORY” written selection
10. Press the encoder to confirm,
11. Rotate the encoder and select the word “MANUMEMORY” (Figure 3),
12. Press the encoder to confirm,
13. Press the encoder again;
14. Rotate the encoder and select a “PLAN” of manual memory of your choice: for example if free “MANU 2” (Figure 3),
15. Press the encoder to confirm,
16.Rotate the encoder and select the word “START EDIT” (Figure 3),
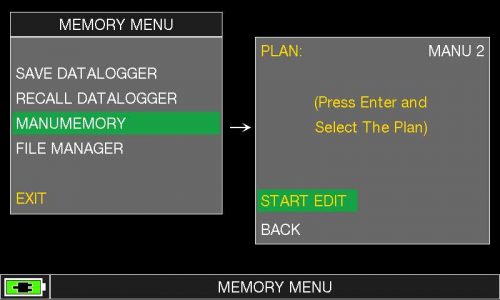
Figure 3: “MANUMEMORY”, “PLAN” and “START EDIT” written selection
17. Press the encoder to confirm,
18. Press the encoder again,
19. Rotate the encoder and select the word “MODIFY ITEM” (Figure 4),
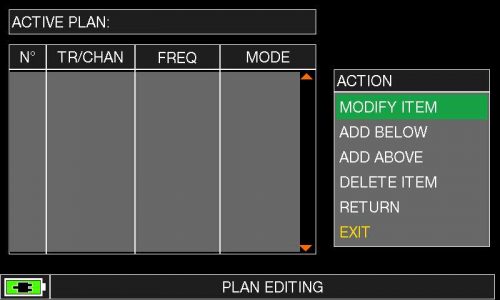
Figure 4: “MODIFY ITEM” written selection
20. Press the encoder and select “DVBS&S2” in the “MODE” field (Figure 5),
21. Press the encoder to confirm,
22. Rotate the encoder and select the word “LNB” (LNB power supply) (Figure 5),
23. Press the encoder to confirm,
24. Rotate the encoder and set band and polarization and the related LNB power value: VL-VH-HL-HH:
– LNB = VL vertical low,
– LNB = HL horizontal low,
– LNB = VH vertical high,
– LNB = HH horizontal high,
25. Press the encoder to confirm,
26. Rotate the encoder and select the word “DiSEqC” (DiSEqC tone – only for DiSEqC devices) (Figure 5),
27. Press the encoder to confirm,
28. Rotate the encoder and set, if necessary, the desired DiSEqC tone value: “A”-“B”-“C”-“D” (A = 4 cables; B = 8 cables, C = 12 cables, D = 16 cables),
28. Press the encoder to confirm,
30. Rotate the encoder and highlight the message “LNBLocOsc “(local oscillator) (Figure 5),
31. Press the encoder to confirm,
32. Rotate the encoder and set the desired local oscillator value, or keep the encoder pressed 2 “and directly enter the local oscillator value using the numeric keypad (for example 9750-10600 for EUROPE or other values for USA & ASIA ). If necessary, rotate the encoder to move between the numbers.
NOTE: For UNIVERSAL LNBs, set 9750 MHz for transponders (VL and HL) in LOW BAND and 10600 MHz for transponders (VH and HH) in HIGH BAND,
33. Press the encoder to confirm,
34. Rotate the encoder and highlight the word “FREQ” (frequency MHz) (Figure 5),
35. Press the encoder to confirm,
36. Rotate the encoder and set the desired frequency, or hold down 2 “the encoder and directly enter the frequency value using the numeric keypad (eg 10992-11373 MHz etc.). If necessary, rotate the encoder to move between the numbers,
37. Press the encoder to confirm,
38. Rotate the encoder and select the word “SYM.RATE” (symbol rate) (Figure 5),
39. Press the encoder to confirm,
40. Rotate the encoder and set the desired symbol rate value, or keep the encoder pressed 2 “and directly enter the symbol rate value using the numeric keypad (eg 22000-27500-29000 Ms / s etc.). If necessary, rotate the encoder to move between the numbers,
41. Press the encoder to confirm,
42. Rotate the encoder and select the word “SAVE?” (Figure 5),
43. Press the encoder to confirm.
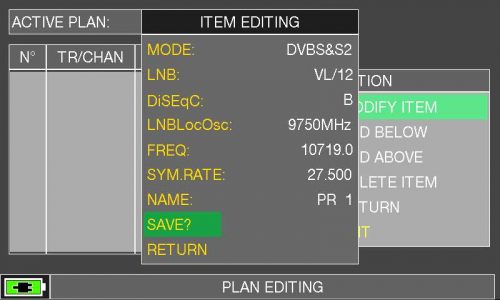
Figure 5: Selection of all parameters and “SAVE?”
The satellite transponder (in our example PR 1) was saved correctly in the selected MANUAL MEMORY (in our example MANU2) (Figure 6),
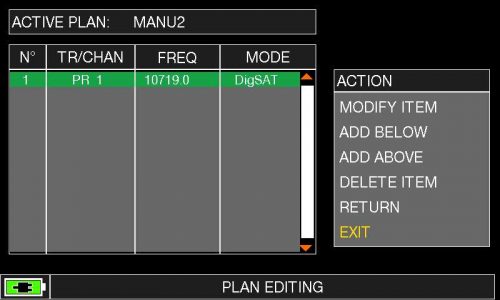
Figure 6: Memory created
If you wish to add new frequencies in the same MANUAL MEMORY, select the word “ADD. BELOW” (Figure 7) or “ADD. ABOVE” (Figure 8) and proceed as indicated in item 20.
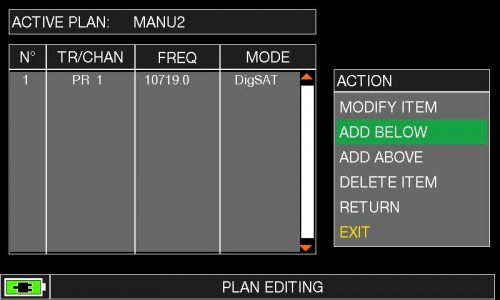
Figure 7: “ADD. BELOW” written selection
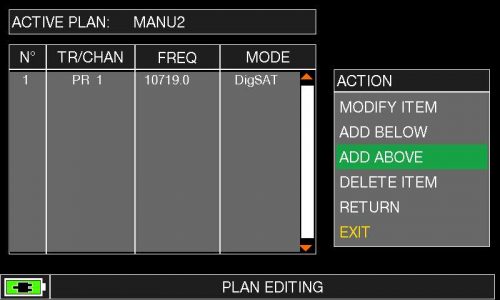
Figure 8: “ADD. ABOVE” written selection
If you want to change the entered frequency, select the word “MODIFY ITEM” (change element) (Figure 9) and proceed as indicated in point 20.
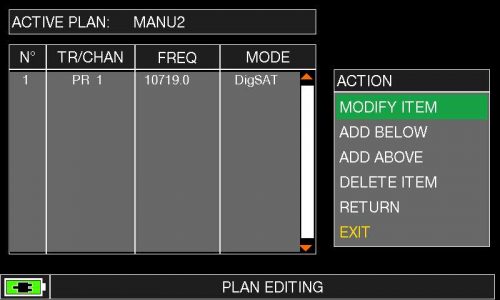
Figure 9: “MODIFY ITEM“ written selection
If you wish to cancel the entered frequency, select the word “DELETE ITEM” (Figure 10).
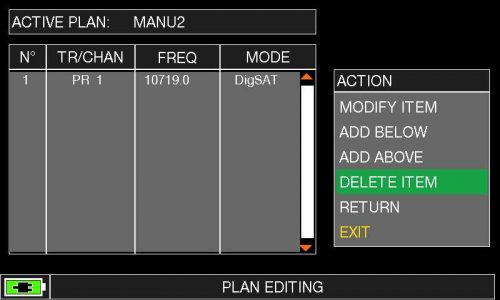
Figure 10: “DELETE ITEM” written selection
NOTE: The MENUS (written and graphic) of the figures represented in the following “F.A.Q.” may vary from model to model, based on the SW version installed and without notice.

